Cool Things to Draw for You Locker

Procreate has apace become i of my favorite iPad apps.
AppleOver the last two years, using the Procreate app -- a CNET Editors' Choice Award winner in 2021 -- to draw on my iPad has become ane of my favorite hobbies. The digital illustration app costs $10 to download, but its suite of fine art tools and creative features make it well worth the price.
Procreate is attainable whether you're a pattern professional, a seasoned digital artist or a beginner to the world of digital illustration. Even though I'm on Procreate nigh everyday, there are still features I'm discovering that meliorate my artwork and endeavor new things.
Whatsoever your art mode, you tin explore the app and try out all of the different features it offers. Here are 15 tips that I've found most useful in my fourth dimension with Procreate to piece of work smarter, non harder:
Gesture controls
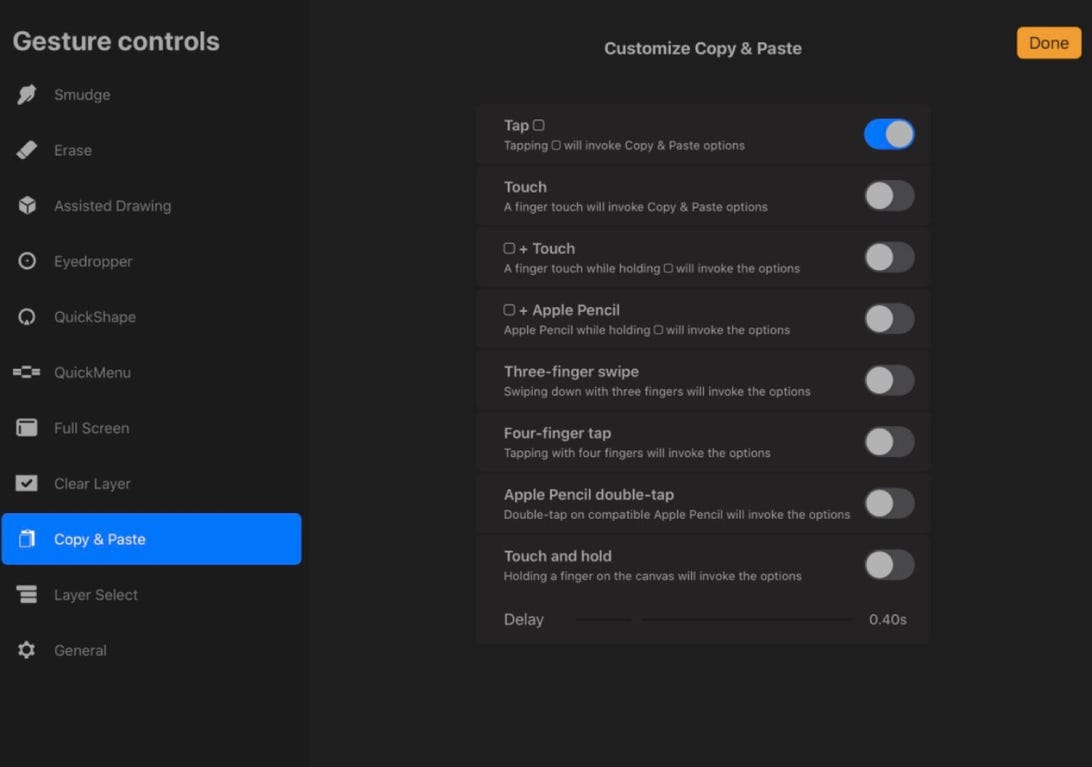
Here's what the Gesture Command console volition expect like.
Shelby Chocolate-brown/CNETiPadOS lets you utilise gesture controls in Procreate that tin can make your creative process more efficient and further personalize the app for you lot. You tin can explore all the customization options by tapping the wrench icon > Preferences > Gesture Controls. For example, you can set information technology so that y'all tap four fingers to immediately populate the re-create and paste options. You can likewise employ three fingers to scrub the screen and clear a layer. Y'all can further customize by setting upwardly Quick Menu in the same panel. Quick Menu provides a faster fashion to adjust layers, admission the colour panel, bandy betwixt brushes and more than. To edit your Quick Menu contents, or make a new ane, simple long press on any of the icons.
Read more:The all-time Apple iPad apps of all time
Quickshape
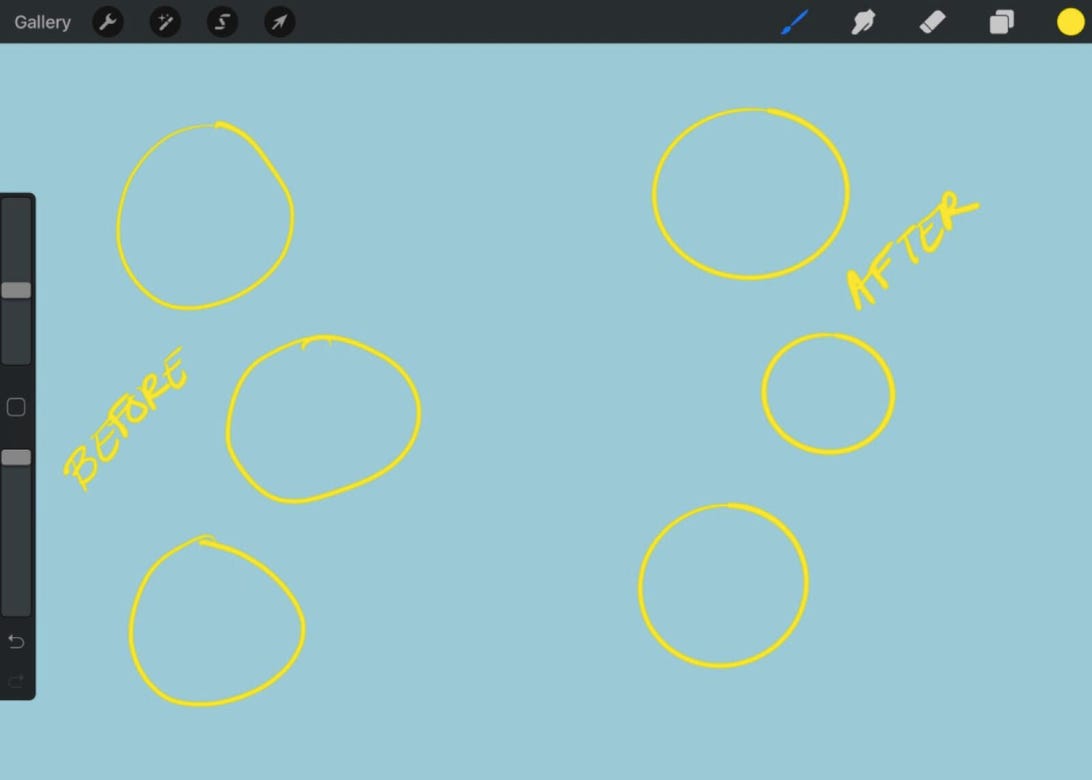
Circles, before and after Quickshape.
Shelby Brown/CNETThe Quickshape feature helps to rid your manus-fatigued work of unwanted shaky lines and lopsided shapes. Subsequently Quickshape "fixes" your lines, you tin hold to arrange the shape and size. You tin can find Quickshape by borer the wrench icon > Preferences > Gesture Controls > Quickshape. The feature is prepare default equally "draw and hold," but you lot can customize the settings to best fit your needs.
Layers

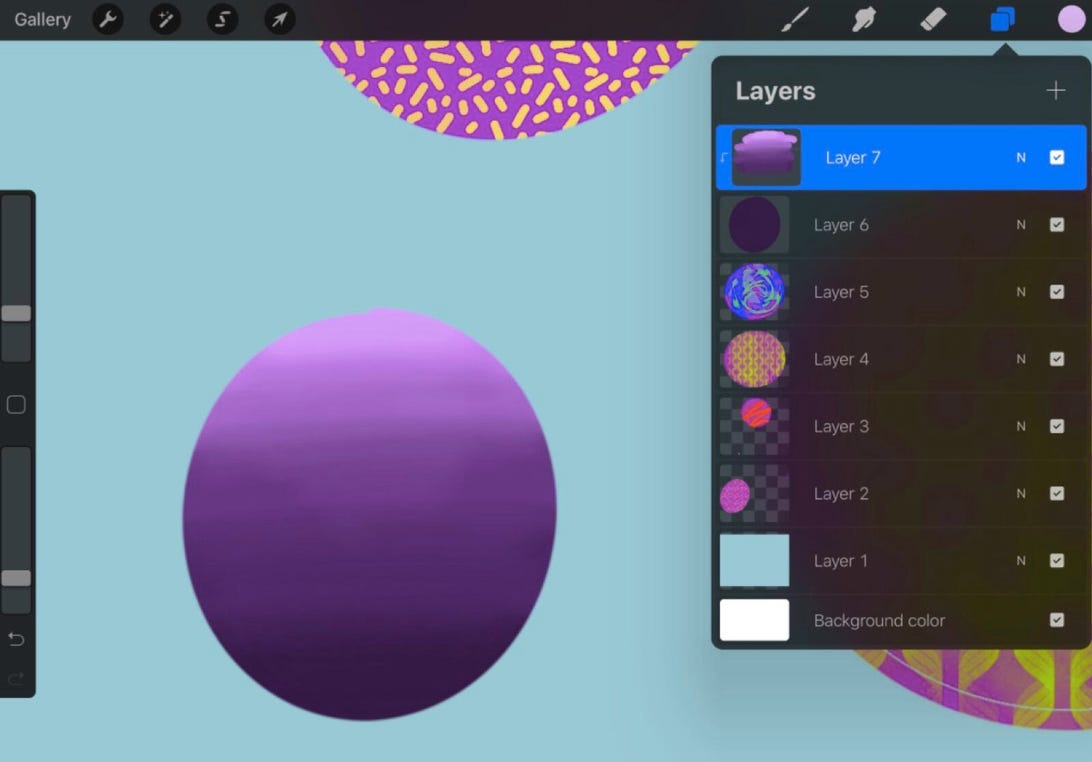
A look at Procreate's layers panel.
Shelby Brown/CNETUsing layers is another way to add together a level of professionalism to your fine art, and tin make your work easier to edit subsequently if needed, since you'll have put downwardly your cartoon piece by piece. To start calculation layers to your piece of work, tap the overlapping squares in the upper right. Tap "+" to add together a layer. You can also swipe on a layer to access more features like delete, lock and duplication.
Y'all can detect extra light and color editing features for each layer as well. Just tap the little "N" next to the check marker that selects the layer. There's a lot to explore in here and my advice is to permit yourself experiment. If you're feeling totally lost, YouTuber Brave The Forest has a great video showing how it all works.

Editing options within a layer.
Shelby Brown/CNETTo stay organized, or if you desire an added level of security to a section of art, y'all can combine layers into groups. Simply tap a layer and you tin select either Merge Downward or Combine Downwardly. Merge Down makes two layers into one (i.e., if you had Alpha Lock on to protect line boundaries in a layer, it will turn off). Combine Downward forms a new group, simply notwithstanding keeps each private layer'due south specifications active.

Layer ane, two and 3 merged, layer four combined and ane-4 is a grouping.
Shelby Brownish/CNETRead more: 5 online drawing classes you tin can take right now
Alpha locks
The Alpha Lock feature lets you edit a layer, just merely the pixels already in that location, to keep what you're drawing within a certain purlieus. Yous can tell when Blastoff Lock is turned on by the checkerboard that appears next to the thumbnail. I used Alpha Lock on layers 2, iii and iv, for example.

Alpha Lock enabled on layers 2, 3 and 4.
Shelby Chocolate-brown/CNETClipping masks
Meanwhile, the Clipping Masks feature works like painter's tape. I find it helpful when using blend mode. Create your shape on a layer and then add a new layer. Tap the newest layer and select Clipping Mask -- yous'll know it worked because yous'll see a footling arrow pointing to the layer below. For example, layer 7 was a clipping mask to brand the blend for the circle in layer 6.

Clipping mask on layer vii.
Shelby Brown/CNETMaking color palettes
Depending on your art manner, keeping colors consistent tin make for a improve final product. Tap the circle of color in the upper right corner of the app to open the color disc panel. If yous want, instead of a disc, you lot tin can customize and use a classic gradient or become technical with sliding confined that control colour value.
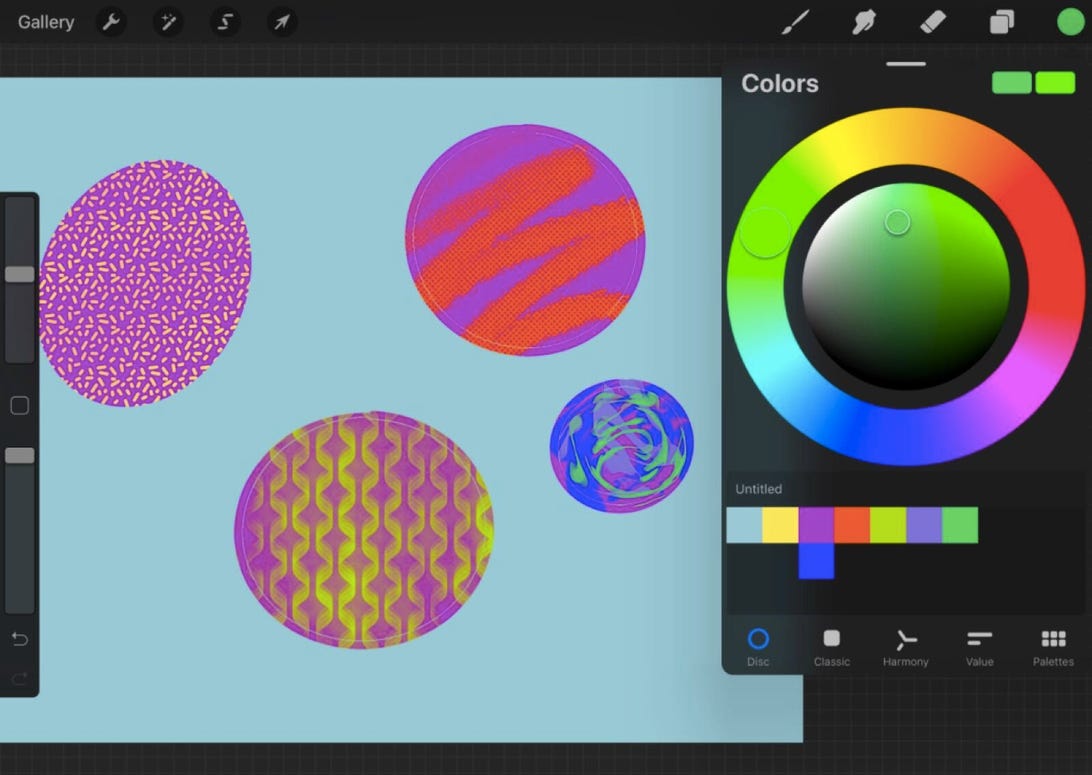
A look at the color disc and colors added to a new palette.
Shelby Brown/CNETProcreate has iii premade palettes that you can set as default, or you can also add together your own color palette a few different means. To manually build a color palette, tap the "+" in the meridian right side by side to Palettes. This will create a new empty palette that volition exist available when you go dorsum to the color panel.
To add colors to the palette, just select the color y'all want and tap in the palette box to keep it. If yous change your heed, tap and hold on a color to delete it from your palette. If you go dorsum to the palettes tab, you can proper name it or delete a palette if you don't need it anymore.
When you tap the "+" you can also choose New from Camera, New from File or New from Photos. New from Photographic camera opens your iPad'due south camera and lets you lot capture a color palette past snapping a photograph. You can also use New from File or New from Photos to utilize a premade palette from another artist or generate a palette from a reference photo.
Eyedropper tool
I of my favorite parts of Procreate is how much you can customize the colors yous use, and in such detail. With the eyedropper tool (which is also customizable in gesture controls) you can hold down over a color to pick it up, or concord down, drag and zoom to get more detail in your utilize of color.
This tool is also helpful when you lot're trying to achieve a smoother blend.
ColorDrop
The Procreate ColorDrop characteristic acts like the bucket fill once did on Microsoft Paint. To utilize ColorDrop, choose the colour you lot want from your palette, and tap and hold on the colour circle in the upper right corner. Elevate the color to where yous desire it on the canvas and let get. The colour will either fill your whole sheet, or work around the shapes you've already placed.
Sometimes if you use ColorDrop, you might notice that information technology "spills" on the whole canvass. I've had ameliorate luck decision-making the color if I used Quickshape, just you tin also go on to hold downwards and drag left or correct to adjust the ColorDrop threshold.
Manual blending
Using alloy mode on layer seven's clipping mask.
Shelby Brown/CNETZooming in on pixels and trying to grab colors to brand something look smoother is time-consuming and exhausting. If you're not quite comfortable with the more avant-garde blend modes, the smudge tool and Gaussian Blur have saved me many a headache.
The smudge tool lives betwixt the paintbrush and eraser icons in the top right (it looks like a finger pointing diagonally). When y'all tap the smudge tool, you tin can select from a number of unlike brushes to go on consistency with the brush y'all originally painted with. The castor size and opacity are adjustable on the left-manus side.
Gaussian Blur requires even less work. One time y'all have the drawing you want to mistiness, tap the icon that looks like a magic wand in the upper left and choose Gaussian Mistiness. You lot can cull to control the mistiness intensity on the entire layer (slide your pencil back and forth on the screen to increment or decrease the mistiness) or accept a more detailed arroyo by choosing Pencil (like a more focused arroyo, similar to the smudge tool).
Adjustment tools
The liquify edit options in the Adjustments tab.
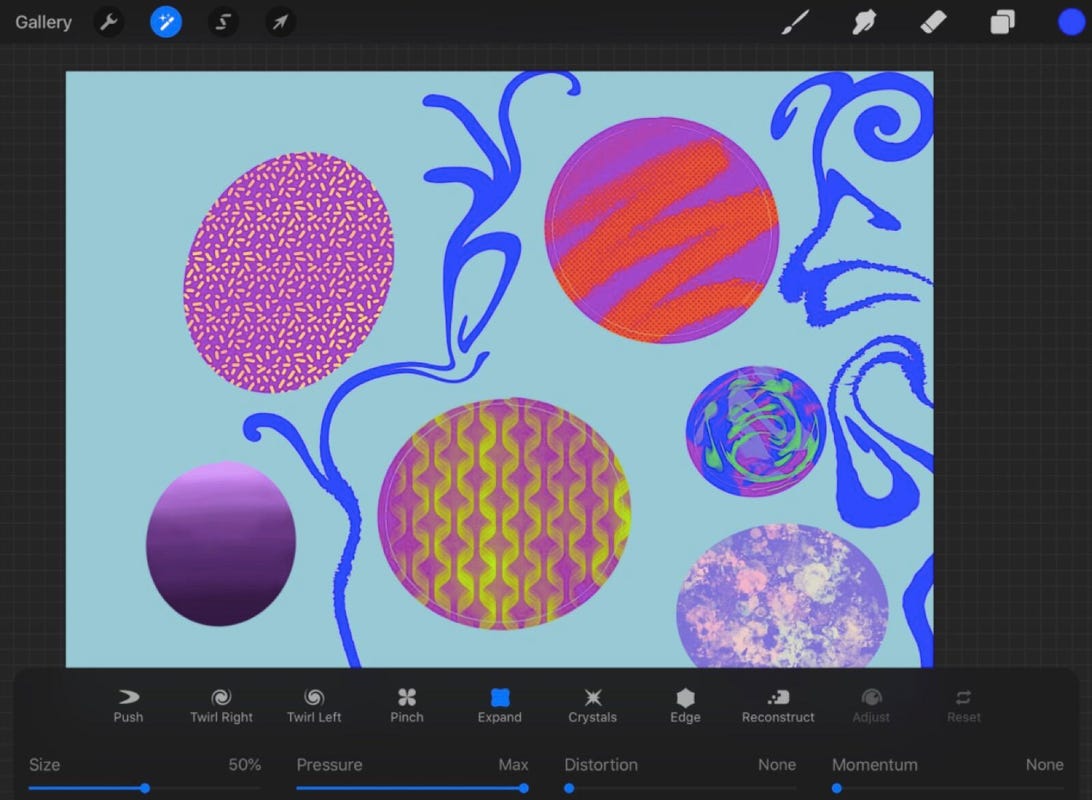
Shelby Brownish/CNETNext to the wrench icon is a little magic wand icon. If you tap that, y'all'll see (surprise!) more than editing tools. You tin experiment with tools similar blurring (which tin can provide some absurd depth illusions), opacity and noise (which tin give your work a less grainy look). I of my favorites to play with was the Liquify tool. Liquify lets you push, pull, twist and twirl lines.
Brush Studio
Open up Brush Studio by borer a second time on a brush in the library. You lot'll observe dozens of different ways to customize your brush or create an entirely new brush. In that location's a lot going on in here (in one case again, surprise!) and I'd recommend keeping it simple to start -- especially if y'all don't plan to create your own brushes. Feel free to experiment though; the Drawing Pad window shows y'all exactly what a brushstroke will look like with the changes you've fabricated. Simply tap cancel and nothing will be saved.
Stroke Path is a good place to dip your toes in Brush Studio. Stroke Path -- which lets you suit your brushstroke -- includes Spacing, Streamline, Jitter and Fall Off. Each holding can be adjusted with a slider and you can see what the brush will look like in Drawing Pad.
Adjusting Spacing changes how smooth (less spacing) or jagged (more spacing, which can really create a postage stamp) your stroke is. Streamline too controls a smooth stroke. If you're interested in using calligraphy or handwriting in your art, increasing the Streamline tin eliminate the trivial shakes that can make lines imperfect.
On the other hand, increasing Jitter makes for a more rough edge on a brushstroke. Lastly, Fall Off plays with the stroke's opacity, making the end of the stroke fade. The more Fall Off, the shorter your stroke will be before the "ink" runs out.
Importing brushes
There are probably endless combinations of brushes that you can utilise to create -- even without tweaking them in Castor Studio. But many talented designers have premade castor packs that you can download online. I'thou partial to importing castor packs from Artistic Market, but sometimes artists will sell packs on their websites. Packs can cost a few bucks or exist pretty pricey, merely nearly websites allow you filter based on price.
Packs tin exist equally niche or broad as you can imagine -- basic sketching, fur texture, glitter, risograph, fabric texture, stippling and more than.

A pick of watercolor brushes I imported from Svetlana Tigai, professional person known as Tsvetka, through Cubebrush.
Shelby Chocolate-brown/CNETText
You lot tin can incorporate text into your piece with just a few taps. Select the wrench icon and tap Add Text. A text box will pop up on your sail forth with your iPad keyboard where you lot can type what you lot desire. To edit the text -- double-tap the text to select all -- and tap the Aa in the top right corner of the keyboard. Tapping Aa will open the text editing suite where yous can modify the text font, way, size, kerning and more than.
Drawing guides and reference photos
No thing what your creative level is, a bit of guidance is always welcome. One way to exercise this is by turning on Drawing Guides. Simply tap the wrench icon, toggle on Drawing Guide, and a grid will appear over your canvas. Y'all can make adjustments past tapping Edit Drawing Guide, which offers four different modes:
- 2nd Grid: This square grid pops up automatically when you lot turn on Drawing Guide.
- Isometric: A cube grid, handy for drawing cutaways of rooms and buildings.
Both the 2D and Isometric Grids take sliders to adjust opacity, line thickness and filigree size. Y'all. can also toggle on Assisted Drawing, which simply lets y'all draw straight lines -- kind of like Quickshape for circles.
- Perspective: Create up to three vanishing points, which can aid when you're trying to attain depth in a slice. You can too plow on Assisted Cartoon to brand straight lines.
- Symmetry: Divides the sail vertically, horizontally, by quadrant or radially. You can create some cool pieces by turning on Assisted Cartoon. Radial symmetry with Assisted Drawing turned on lends itself to creating mandala designs.
If you're drawing from a reference, you tin go along the prototype in a separate window. Tap the wrench icon and toggle on Reference. You tin can reference the sheet itself, import an image from your iPad photo library, of choose Face, which will open up your iPad's front-facing camera for self-portraits. You can either go along the photographic camera open up (like if you were working in forepart of a mirror) or you can tap Options to accept a photo.
Have fun!
At that place'southward a lot going on in Procreate and it can seem overwhelming, but the more you utilize the app, the easier it gets. Having fun is the most important part. If y'all're getting too stressed about non getting a piece "right," accept a suspension and merely doodle. Information technology's fun (and less pressure) to upload blank coloring sheets to a canvas and experiment with the tools that mode. At that place are dozens of means to customize Procreate to help you lot observe or improve your art manner.
For more than on drawing, check out five online cartoon classes you can accept correct now and for quick reference in the app, check out the official Procreate Handbook.
Source: https://www.cnet.com/tech/services-and-software/15-procreate-app-tips-for-aspiring-digital-artists/
0 Response to "Cool Things to Draw for You Locker"
Enregistrer un commentaire